ArcadeCab
12/28/2014
Ben's Arcade
 Ben
sent me the results of his month-long project. From his email:
"I was inspired by your arcade plans to build my own MAME cabinet. The end goal for my project was to build an arcade machine that was inexpensive as well as light. Also, it would need to be small enough to fit through the doorways in my house as I built it in the basement and moved it into the game room upstairs. My initial cut in size and weight started with a modification of your first set of arcade plans as shown below.

The shaded area is your cabinet design and the white overlay is mine.
I decided to go with 5/8" plywood to cut down on the cost. I used a
circular saw to cut my sides where possible and a jigsaw in the tricky
spots. I used a sanding block to straighten my jigsaw cuts. Then I glued
on 4" pieces of 2x2's to be used as ledger board to support the sides.
This cut costs since I could use screws to attach the front, back and
top panels instead of buying a table saw or router to make dados. I also
glued on a 10" strip of 1x2 on each side to support the monitor shelf.
I drilled holes for the speakers and the coin and start buttons and then
painted it. Then I mounted up the speakers, monitor, glass, light, and
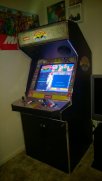
buttons and here's the final result. I decided to go with an integrated
control panel to save on lumber. I just use a wireless mouse and
keyboard for the computer operations. And given the cost of the router
and bits, I decided to skip the T-molding. I think it turned out just
fine never-the-less.
It was a long 3.5 weeks building this arcade machine, but now I've got a
finished product that is super fun to play and always entertains any
house guests that stop by.
I appreciate you publishing your plans online. It really helped give my
a starting point for my project.
P.S. If there was one thing I learned during this project that might
help out others, it was that garage door bottom molding does a great job
of filling the gaps on the edges of the plexiglass."
I liked how Ben made some smart design choices in order to save money as well as better fit the cabinet into his home. Very nice job. Several assembly pics are on the Visitor Page.
12/20/2014
Changes to my arcade
Last month we did a little remodeling work in the room where the arcade
sat, so it had to be relocated to another room for a couple weeks (where
it did get played). When I moved it back in, the power supply
decided it had not liked the moving about and died. As the PC was
from 2002, I wasn't going to spend any money fixing it, so I hit ebay. After a few attempts, I won a
nice little machine.
This being Win 7 64-bit, my old mamewah setup wasn't going to work, so I went to MaLa. I fashioned a similar look to what I had before, and am still working on learning its nuances. There should be a project page within the next week up about my specific setup.
Dragon's Lair, after some work, is now running again. My son was initially concerned about its 'violence' but soon realized it was tame and now loves to play it. I added a project page up for how I set Dragon's Lair up on Daphne for the 64 bit machine.
I also took the time to swap out the burnt marquee light bulb, and to create a new method of powering the coindoor lights. I have created a project page for that might help others.
6/2/2014

Alfie T sent me a note about his arcade:
"I thought I'd sent you a pic of the arcade machine I've just finished building. I stumbled across your website by chance earlier this year and it inspired me to have go at building a machine from scratch. I followed the 2nd set of plans and the only major change was reducing the depth by about 10" as I was only using a 19"TFT monitor."
5/30/2014
 Shawn's
Arcade
Shawn created this beauty, and has a great blog of the entire process,
with tons of pictures (http://shawnsarcade.blogspot.com/).
I always enjoy reading these; they bring back so many fond memories of
my builds.
 Jeremy's
Street Fighter II Champion Edition tribute cabinet
From Jeremy's email:
"Your site was invaluable. Over the course of eight months, I was able to produce my own MAME cab. It's primarily 3/4" MDF with some 1/2" panels. Made some slight custom tweaks from your plans, but this is mostly from your Arcade Project 2 series. So, this is my Street Fighter II' Champion Edition tribute cab. Runs a laptop on a 27" crt tv. Chrome t-molding felt more '90s."
The chrome is very cool!
2/11/2014
 The
KOTLI Cab
Alexandre K modified the
second set of plans
by reducing the depth of the cabinet. He took the resultant plans
to a local kitchen cabinet maker, who used a CNC machine to turn two
sheets of black melamine into the arcade's boards. I would have
done the same thing had the opportunity been available (he paid only
$150 for the boards and the machining- a steal). He used a 21"
flat screen for the monitor.
I have included several assembly pics on the
Visitor
Page.


