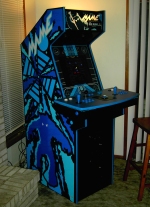
Welcome to the little document on how I built my MAME (Multiple Arcade Machine Emulator) arcade cabinet that, today, can play over 3,500 arcade favorites. I spent the time to create this for all the people who asked for plans after hearing me discuss what I was doing and after seeing pictures of the cabinet's progress. Hopefully this will help you past some of the problems I encountered and point out areas to pay special attention to. You don't have to be too skilled a carpenter to build this nor have fancy tools. I am proof even a computer geek can build one.
The pages are laid out in sequence. On most screens, there will be a series of small pictures at the right. Hover over each and you can see the caption. They all expand to a full screen version so you can make out the details better.
A full menu will always be available on the left of each screen so you can go immediately to the pages that interest you. If you don't like how drab the pages are, sorry. I am not a graphic designer and was too lazy to do anything real elaborate.
Feel free to explore.
Note- There is now a second set of free Mame cabinet plans. These plans include a custom controller. Please feel free to check them out as well the ones you are now in. You can find them either from the main ArcadeCab pages or directly. Or click on the picture below.
|
|