ArcadeCab
Philip's Surprise Project
Philip B has been busy.
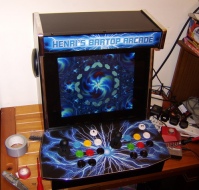
Last month he sent me pictures of his latest project, a surprise Christmas
present for his sister's boyfriend, Henri. I held off posting this
until Philip gave the okay- which he now has. From his email:
"I've used a 17 inch lcd screen and made it using mdf sheets. I had the use of a nice sized workshop to build and paint it from my gf's sister (Big Props to her!) . I also fitted a dvd drive to the side of the machine so a music disc or dvd can easily be inserted. This machine also has a subwoofer fitted as well as two 100 watt speakers with the volume controlled externally. There is a 80mm fan fitted to the back and I've fed this with 5 volts to keep noise from the fan very low. I used a cold cathode light to light up the marquee, this worked really well because there is a nice white light with little or no heat generated (highly recommended for narrow marquees) I used chrome trim all round inc. the control panel, this looks excellent with the black finish. The control panel and marquee were supplied by Scott from mamemarquee.com ( he did a great job and to exact specs too! ) . It has jukebox mode, karaoke mode, dvd, mame, emulators, radio, picture display, weather reports and just about anything else I can cram into it! All in all its a nice machine and I will make another some time in the future. It worked out at about 80 pounds so it is quite heavy but it makes up for it in size, its neat enough to fit in any room really and that was one of the biggest objectives for this project. As for the painting I put 6 layers of white paint on it and then 6 layers of black paint, I didn't use any sideart, that's for Henri to decide whether or not he wants to have it on there."
Great job, Philip, and thank you for sharing. Henri will be thrilled to receive such a fantastic present. I have included a few more pictures on the Visitor Page. Philip also created a youtube video of the project.
11/9/07
Cabinet Update
I am still working on finalizing
the control panel and assembly pages, a few minutes at a time. Rather than
waiting until I finish, the pages are a work-in-progress, so please forgive
the choppiness. Scott has been busy getting the panel completed. Once
complete, he will tackle the remaining tasks such as wiring the coindoor and
installing the software, then I'll get the plans up-to-date. Scott has also
found a local sign company to print his sideart, which he hopes to purchase
and install in early 2008. We can see the light and the end of the (long)
tunnel.
Looking into early 2008
A project that I hope to find time for in early 2008 is a rebuild of my control
panel. Although I like the layout of my panel, there are a few spots I'd like to
correct. Having seen the pinball buttons on Scott's panel (and maybe a
button for the plunger), I'm now envious. In addition, I'd like to add in the
balltop J-stick he is using as well. With several years of experience under my
belt since the original build, I'd like to correct some of the errors of this
first project. I already have all supplies on
hand, and will be reusing most of the parts from the existing panel.
Plans are for the control panel to be laminated, with the trackball plate
recessed such that only the ball itself will show. There is also an outside
chance I will add a
real pinball plunger
with a circuit to track the plunger release. Very cool. As with the single
player panels, I will work up a document on the
build. Free, as always. Stay tuned.
Hector Q's Cabinet
Hector dropped me a line this
week with a few pictures of his cabinet build. He used a 20" monitor,
and hopes to add a coin door soon. He is an avid Street Fighter fan
and is extremely pumped to have completed his very own cabinet.
Congrats, Hector, you did a great job. A couple more pictures are on
the Visitor Page.
10/22/07
Cabinet Update
Scott and I spent a good portion of
Saturday in the shop getting the control panel into shape. We built
the base, and got the top in great shape. Scott learned how to use
(and fight with) a 1-1/8" spade bit, as he drilled all the button holes.
He still

Retroblast is Back!
From the
Retroblast website:![]()
"In a move some might say more foolish than bold, RetroBlast frontman Kevin
Steele is handing over the keys to the RetroBlast.com website to a bunch of
slack-jawed good for nothing punk kids. This will allow Kevin to continue to
focus on the mammoth amount of work that he has been putting into GameRoom
Magazine .
Don't worry Kev, we'll take good care of her!
Kevin has been kind enough to let us publish the full archive of his original
RetroBlast content (articles, reviews, videos and all) and evolve the site to
meet the needs of home gaming enthusiasts everywhere. We plan to continue
bringing you news and reviews of the major happenings in the retro-gaming
community and more." Read the rest on
Retroblast.
10/13/07
Our Cabinet Construction Progress
We finally have some progress to report. Scott and I were able to meet for
several hours a few Saturdays ago and made some progress. We got the cabinet
assembled in his house and had it to the point Scott could do some work
where I wasn't needed. And do some work he did! Over a few evenings he was
able to get the door on, coin door installed, marquee installed, speaker
grills, mesh, and speakers themselves installed. He got the PC setup inside,
monitor shimmed and locked down. He ordered and installed the monitor glass,
then finalized his bezel artwork, had it printed, matted and put in place. I
know I'm missing some of the tasks he finished up but the point is we are
getting close. As I find time, the Cabinet 2 plans are slowly being updated
and added to, and you should start seeing some new pages soon. We have
scheduled a shop day in another week to construct the control panel.
Then we'll just have to get it painted, wired, installed, and get the
finishing touches complete on the cabinet. We might actually hit the
(original) target date of Christmas... just the year being 2007.
Charlie's Project
Charlie and his dad are building this cabinet
straight from my original set of plans (wit h
the usual number of slight mods). Although he took a little coaxing,
his dad quickly got into the project. This picture is after three
Saturday's of work. The P4 he is using was saved from the recycler by
Charlie, and he is using a 21" CRT. Still to do (from his email):
h
the usual number of slight mods). Although he took a little coaxing,
his dad quickly got into the project. This picture is after three
Saturday's of work. The P4 he is using was saved from the recycler by
Charlie, and he is using a 21" CRT. Still to do (from his email):
"Still to do - aside from the obvious (marquee, front door, glass) I want
to add routered grooves in the marquee area so that I can remove the very
top and slide the marquee straight down with no need for the marquee clips
(will also enable marquee switching on the fly, if needed). Also, I'm going
to wire the PC's power button to a small "doorbell" button hidden somewhere
on the cabinet (or maybe rig the coin return to start the PC), and a friend
turned me onto the "Smartstrip" powerstrip
http://www.smarthomeusa.com/Shop/Hardware-Cable/Item/LCG1/
which will turn everything else on when it senses the PC has been turned on
(speakers, marquee light, etc). This cab will also have a section for
headphone jacks and a volume control which I'm going to remove from my PC
speakers and mount. I may add a hidden webcam behind the glass facing the
player so that I can take surreptitious shots of people grimacing like
fools as they play the games. I was also thinking of splitting the video
signal and having a video projector set up in the top of the cabinet to
shoot the game play onto a room wall which would be pretty cool at a party -
everyone watching you suck at Pac-man!"
Click on the
cabinet picture to see his animated, 3D tour of his build (warning: slow on
non-broadband users). I'm looking
forward to seeing the completed pictures soon.
9/3/07
Retroblast gone
One of the great MAME hobby sites,
Retroblast.com, has shuttered its
doors. Citing a number of issues, Kevin Steele has decided to shut down the site. I find this
sad but completely understand his reasons. It is indeed time consuming
to keep a site up and current. ArcadeCab has infrequent News items and
even less frequent project postings because there just isn't enough time
left over after my real day job, and then spending time with my family.
Family time will always take precedence for me. That said, I will miss
Retroblast. Check out his home
page for more details.
Chris B's Cabinet
Chris B emailed me a link this
week to his cabinet project. He slightly modified the original cabinet
plans to account for his height, and used a
TankStick variation
from X-gaming that I was unaware even existed. The cabinet uses XP as
the OS and Chris is running Gamex for
the front-end. Chris has also started up a new
website,
where he has included a large number of construction pictures in addition to
other MAME-related information. I like how the cabinet turned out.
Go check out his site.
Joel N's new BarTop added to the Examples Page
Joel has nearly completed yet another BarCade, this one running
Wah!Cade and a slew
of console emulators. It features a spacious 17" horizontal monitor
for the "old school console games". He includes a bunch of
construction shots, a list of materials, as well as a page detailing his
software installations. This time around he chose to use Ubuntu
6.10 as the OS and the software page will help anyone looking at that
option. Finally, he used
kreg fasteners to construct the BarTop, so there are no external screw
holes to fill in. I've included a couple more pictures on the
Visitor Page,
and there are many more on
Joel's page. Nice job!
7/14/07
Mamewah instructions for setting up the new release
1.62B13
I have been having an increasing number of Mamewah questions
of late. I![]() t
seemed that my instruction page was out of date. So I headed to
Mahwah's download site and pulled down the newest release and set about
installing it on my cabinet. Boy, were there some changes! After
a length of time I got it working fine and detailed how to do it. I
have also included all the files that were needed to get mine set up so you
can have a working example. Give the picture above a click. I
hope it helps.
t
seemed that my instruction page was out of date. So I headed to
Mahwah's download site and pulled down the newest release and set about
installing it on my cabinet. Boy, were there some changes! After
a length of time I got it working fine and detailed how to do it. I
have also included all the files that were needed to get mine set up so you
can have a working example. Give the picture above a click. I
hope it helps.
Dark Tower Flash Game
I remember playing Dark Tower at a friend's house for hours upon hours.
It was before PCs (do you remember that far back?), and it was a great addition to the board games
we played. There's a fantastic recreation of this board game online now.
I've played it a few times over the past months and it does bring back some
memories. Give it a look if you remember the original. Or check out
ebay to see what the originals are selling for these days. From the
site:
"Do you remember Milton Bradley's 1981 hit board game? If you do, then this
game needs no explanation, but if not then give this classic treat a try.
This hot Flash game faithfully recreates Dark Tower's single player
experience."
7/3/07
How Slow Can You Go?
Discovered an interesting
blog on Aaron Guile's site.
Aaron is a MAME developer, and is currently the coordinator for the MAME
project. His site has some interesting articles, and I found value in
this one where he benchmarks PacMan performance from MAME v.37b through
0.113. There are some good responses that are worth reading through,
too.
6/25/07
Chase Michael is Born!!!
We have a new addition to the family. Chase Michael was born this
morning at 5:49. Weight: 7-11, height: 21-1/2". Mother and baby
are doing well. Here are three pictures. More are on
Alex's page.
 |
 |
 |
6/16/07
AdSense Revisited
I have decided to retry adding some Google ads to the site. When I
originally tried it out, there were fewer relevant advertisers than there
are today. A visitor's remarks got me thinking. I have begin to
add them to the pages that include enough arcade-specific terms to get the
relevant ads. This includes so far many of the original cabinet plan
pages. I hope these don't distract you too much. I'll give them
a couple months to see if they generate more benefits to me than
distractions to you.
6/14/07
Philip's Project
Philip B, from Ireland, has
finished his first cabinet. Philip is another Mamer who is using an
X-box to drive his system. He is using the
X-box Media Center
as the
front-end and absolutely loves it! The following is excerpted from his
email:
"I used a
Samsung 19 inch lcd in part because it was on sale but more because the
screen was nearly flush with the full bezel which meant I could get the
glass right up against the entire screen and it turned out brilliant.
The front end i used is called Xbox media center; you really
wont believe how incredible this program is, and it's free! From that
front-end I can launch
mamedox
[...]
For neogeo and cps1 and cps2 I use both
kawax and
fba-xxx
emulators which are incredible. Other emus I have on the machine are genesis,
nes, snes, gba, Atari 2600 and
Nintendo 64. Also of course the real Xbox games
work; Dead or Alive on it looks like the real arcade machine running it [...] I also have
a Belkin wireless adapter fitted inside the cab and connected to the Xbox. This gives me my full collection of movies, pictures and mp3's streaming
from my pc from anywhere in the house! This also provides rss streams
flowing across my front-end; if I choose to do so I always have the latest
news. It also provides me with my local weather and
previews of all the Apple trailers available. I have a 200 watt sub woofer in the
base and two speakers overhead the screen, volume controls are beside the
joysticks and there is also a headphone socket available. I used your links
to get the t- moulding (which saved me a lot of money ) and the marquee i got
from marquees.com."
Philip had some help with the construction from his son. What a great father-son project. He hopes to build another one soon, but make it shallower so it takes up less floor space.
Great job, Philip!
More pictures on the Visitor Page.


