ArcadeCab
Section 1: Overview
Section 2: How-to, along with example files
MameWah 1.61 and prior
Section 1: Overview
[Note 7/13/2007- I have added instructions for installing version 1.62.
Note 8/6/05- I have added Section 2 to this page but have left the first section as it was originally written.]
Introduction
Okay, this side project began as a mission to find a more user friendly front end than MAME32 for my cabinet. MAME32 served me well for the past two years but seeing what others were doing with their cabs made me want to investigate other alternatives. I initially intended on investigating Mamewah as well as Ultrastyle and ArcadeOS but that didn't end up happening. The main reason is that I got caught up in everything Mamewah had to offer and, consequently, did not have the time to give the other two FEs the attention they deserved.
Background
According to the Mamewah site "MAMEWAH is an ArcadeOS inspired frontend for DOS / Windows command line M.A.M.E. (NOT MAME32) and other command line emulators under Windows 98/ME/2000/XP. MAMEWAH is designed to hide the Windows environment and also to be controlled purely by arcade controllers (joysticks and buttons)." It is a British production by Minwah.
Installation
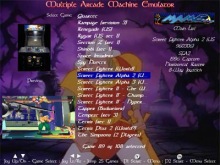
Mamewah was easy to install. I downloaded it and the required system files from Mamewah's site. Less than ten minutes later it was running on my cabinet with the default settings. Mamewah comes with several default 'skins'. I chose the 800x600 version and did some fiddling with it with the excellent screen designer. However, I wasn't able to get the "oomph" I was looking for. Luckily there is the ScreenShots Archive which has a great many excellent, downloadable skins to try out. I chose a nice Dragon's Lair skin from their selections. This archive also includes a wealth of other related resources such as sample configuration files for various emulators, a great tutorial (which I did not read first), and other helpful information. A fantastic site!
Dragon's Lair skin (from the ScreenShots Archive)
Working with the skin
I downloaded and installed the skin easily but when I ran it, I could not get the background image to show up no matter what was tried. After an hour of scratching my head, I searched the BYOAC software forum and found the answer quickly. The skin was created for an older release of Mamewah, before the naming standard was changed. Background images now needed to be named "mame-main.jpg". Once this was done, everything worked flawlessly.
I added another image to the screen for the control panel photo (if available). (Note- In case you don't have the control panel art in the cpanels folder, they can be found here.) Another default setting I changed was the graphic that is displayed if there is no cabinet or control panel art for the game to be displayed. I simply renamed the default image to something different to keep anything from being displayed. This just looked cleaner to me. Both these actions were simple and intuitive.
Documentation
More or less everything is documented in short text files included in the installation directories. The answers were not always clear to me without several re-readings but I cannot necessarily fault the docs as I am not always the most careful reader.
Use
As noted in the background above, Mamewah requires only the joystick and the two player start buttons to run (and, of course, the escape sequence to exit). Joy up or down goes to the next or previous game in the list, respectively. Left joy sends you up 25 games, right down 25 games in the list. Player start 2 takes you to the menu system and player start 1 is always the selection button. Very, very simple! In fact, the skin I chose listed the controls at the bottom of the screen. Navigation could not be any easier or more user friendly. However, we will see how novice users will react when they see the new interface for the first time.
Conclusions
The time I have spent with Mamewah thus far has been great. In the coming weeks, as I get time, I plan to further personalize it for my cabinet. It is a great product which I give two big thumbs up!
Section 2: How to install Mamewah version 1.61 or before
Note that this is for 1.61 or before. My instructions for 1.62 or later are here.
1) Download the system files zip and the Mamewah installation down from Mamewah's site;
2) Follow the directions and install the system files; and
3) Do the same with the Mamewah download.
Now we will examine the folders Mamewah has installed and begin changing them.
My directory structure
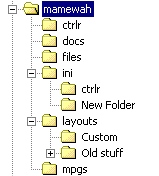 You
can see how my Mamewah folder structure is set up to the left. (You
can ignore the two extra folders that are there to hold any original files
prior to my changing them.) If you are following along, make sure that
your folders are set up the same. More than likely, they are already
that way by default.
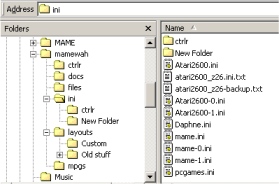
We will begin with the C:\Mamewah\ini folder. Within the folder you will place mame.ini, mame-0.ini, and mame-1.ini. Also add in pcgames.ini if you wish to ever play any PC games via Mamewah (you will!). The Atari2600 .inis you see listed can be found on the Atari 2600 page, in case you wish to set that up now, as well.
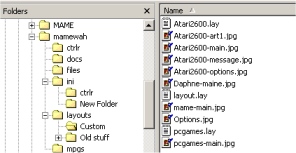
Next move to your layouts folder (C:\mamewah\layouts\Custom). Create it, if it doesn't exist. Move mame-main.jpg, Options.jpg, and layout.lay into this folder, at a minimum. The pcgames-main.jpg and pcgames.lay files are slight variations of the mame layout. Again, feel free to visit the Atari 2600 page for its items. You should now have a folder that looks similar to the one to the left.
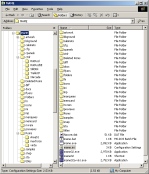
As a reference, my MAME installation folder layout is included to the right. (Click it for a larger image) You want to ensure you have a copy of the Windows Command-line Mame executable in this directory (C:\MAME\). This can be downloaded from Mame.Net (top of the list). Mamewah requires the DOS version of MAME in order to work. You can now copy my mame.ini file to C:\MAME\. Once you download this file, you must change the file name to mame.ini as it is not named that way at present. That is all you need to set up for the Mame folder. (Update- You might not need Mame.ini in order for your setup to work. It has specific settings that I use that you might benefit from.)
You should now be ready to test your installation. If you followed this setup, everything should work correctly now. You will be taken to your Mame game screen first. It will more than likely be empty. Just go into the Mamewah menu (Player 2 start button), click on Games List Options, then Generate List. This will create your list and you should now see all the games listed.
Getting the PC games to show
For the PC games to show, you will need to create two new folders, C:\pcgames\shortcuts and C:\pcgames\snaps. In the /shortcuts folder, add a shortcut to each PC game you wish to see in your list. If you want a screenshot to show in Mamewah, you will want to capture a screenshot and save it in \snaps with the same prefix as the shortcut, and .jpg or .bmp or .png as the suffix. For example, if you have a shortcut for Doom in the shortcuts, you will want to name the corresponding image as Doom.jpg in the \snaps folder. This allows Mamewah to associate the two files properly.
All Done
Everything should now to set up and ready to go. You can read the Mamewah docs for the description of what button does what, but the basics are:
|
Player 1 Start- Starts the game that is highlighted. Player 2 Start- Enters Mamewah's menu system. Player 1 Coin- Cycles through the current emulator's various subsets (All Games, Favorites, and Most Played) Player 2 Coin- Cycles through your available emulator list (Mame, Atari 2600, PC Games) |
I hope this set up has helped you. Mamewah is really quite easy to set up but you can be tricked up with some of the small details. If you use the files I've included, these problems should not arise. Mamewah is a fantastic frontend for my cabinet, I hope you find it the same for yours.
My files


Links
New 7/30/2005-
I have added the Atari 2600 games to my cabinet. To see how
it was done, click the below link.
